Target Groups
By using target groups you can generate company and personal groups for email marketing, telephone contacting and so on. You can create several different target groups for each need.
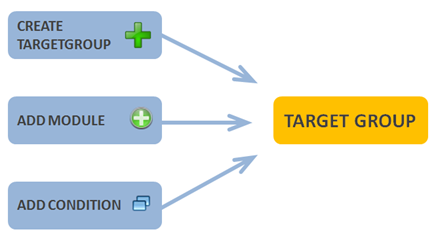
Creating a Target Group
To create a target group, you first need to determine the basic information of the group. The creation starts by clicking the Create TargetGroup button ![]() .
.
You will need to fill in the following information:
- Target Group Name
- Target Group Number
- Type
- The status of the target group in the field Public. The status can be set to No, Yes (read) or Yes (write) depending on what kind of modifying access you want others to have in this target group
- Is the group is active
- The person assigned to this group.
If the target group relates to an email template, you will need to add the wanted email template to the field Send email template. If you also want the target group to update on the background when the email template’s sending time comes, you’ll need to mark the checkbox Automatic email campaigns active.
After saving the information of the target group is shown and it is now possible for you to add conditions related to this group in the Conditions tab.

Searching for Content
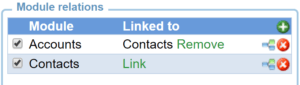
To add conditions to the target group you must first determine the modules you want to use as the source for the conditions in the section Module relations (see the picture below). The modules Accounts and Contacts are linked by default, but the link can be removed if needed. With the Add module button ![]() in the module relations you can add the wanted groups. With the Link function the modules added can be connected to each other to create a relation. The Add linked module function
in the module relations you can add the wanted groups. With the Link function the modules added can be connected to each other to create a relation. The Add linked module function ![]() shows a list of suggested modules to link to the original module.
shows a list of suggested modules to link to the original module.
If you want the target group to include only a smaller sample of the contacts chosen, you can add a module relation of Functions to Contacts and add conditions of Sample interval or Simple random sampling.
To be able to see the content of the target group in the summary, you must update the summary with Update with current conditions button in the Actions section. At this point the target group is generated only by the module relations (no conditions have been added yet).
Adding Conditions
You can create a new condition by clicking the Add condition button at the bottom left corner.
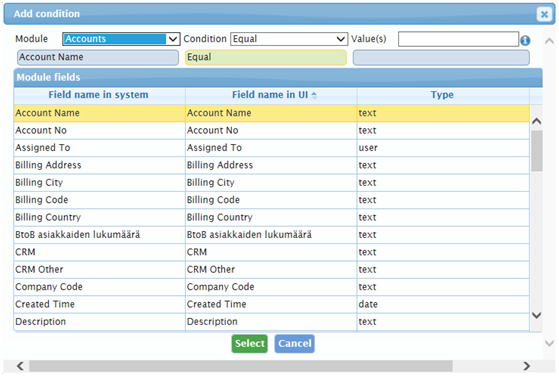
The following fields need to be filled for the condition:
- In the Module field you select the module which has the information needed
- Use the Module fields table to determine the field in the module which is searched for the certain value(s). After this you can determine the condition and value(s). If the type of the chosen field is “Select”, you can choose the picklist’s value(s) using the
 icon that appears next to the Value(s) field
 - In the Condition field you determine the operator (greater than, less than, equals…)
- In the Value(s) field you determine which value(s) is/are searched for in the field. If you want to add multiple values into the same condition, separate the values using the character |.
Conditions of the Function module:
- Sample interval makes a sample which includes only the entities that are a certain interval apart from each other (e.g. every third entity). The sample interval is set in the Value(s) field.
- Simple random sampling goes through all the entities and includes every one of them in the sample with the same given probability (e.g. each entity has a probability of 80% to be included in the sample). The sampling ignores possible relations between the entities.
The target group can be formed using multiple conditions. When you create more conditions using the Add condition button, the relation between the conditions is always in AND format. If you want the conditions to be exclusive (in OR format), you can create a new condition by clicking the Add OR condition icon ![]() on an existing condition with which you want the new condition to be in OR relation.
on an existing condition with which you want the new condition to be in OR relation.
When you have created all the conditions needed, click Clear the target group entities and then Update with current conditions to get an updated summary.
NB. The condition can only be created with the information included in the modules selected in the module relations.
Target Group’s Actions
When you have created all the wanted conditions and the target group is ready and updated, you can export the information in Excel and CSV formats. While exporting the information you will always choose between a list of Accounts or Contacts.
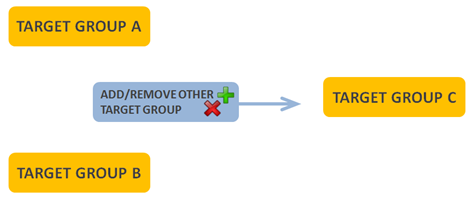
With ready-made functions you can remove duplicate emails, remove contacts that opted out, remove accounts without contacts, add/remove other target group and add/remove site visitors.
You can also create activities with the target group – for more information, see Creating Activities for a User with Target Groups.
More Information tab
On the More Information tab you can examine what changes have been done inside the Target Group in the section History. You can also examine the contacts or accounts of the target group.
Use Examples
1. Search for customers which do not have any contacts
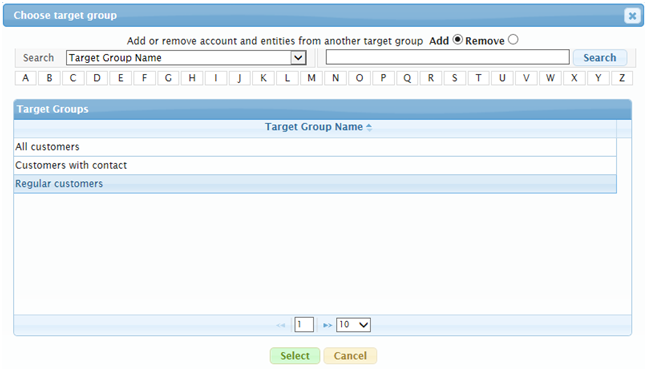
First create a target group A that consists of all the customers and contacts. After this you need to create a target group B that consists of all the customers. Then, click the Add/remove other target group button on the Conditions tab of the target group B. A pop-up opens up (see the picture below). Select the target group A from the list and the Remove option at the top right corner. After clicking the Select button you have deleted all the customers that had contacts from the target group B.
NB. Combining/removing target groups is possible only if the target group you want to add or remove is active. The publicity does not effect.
2. Search for customers of a certain worker, which have not been updated since the year 2012
In this case set the first condition to include only the accounts assigned to this certain worker: e.g. in the module Accounts the field Assigned to should contain “John Smith” (see the picture below). As a second condition determine the date, modified time is less than “1.1.2013”. In this case we want to take into consideration both conditions when creating the target group and that’s why the relation needs to be in AND format.

3. Find out which customers have been contacted after 1.1.2013
Add the modules Accounts and Activities and link these modules together. Next create a condition by clicking Add condition button. Select the module Activities, condition greater than and value “1.1.2013”. Lastly, update the target group with the condition.
![]()
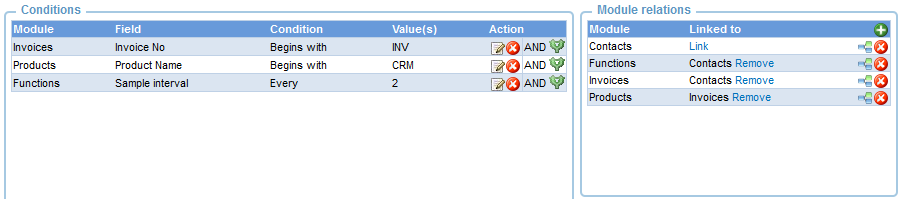
4. Have the contacts that have been invoiced during the past 10 days
Add the modules Contacts and Invoices and link these to each other. (NB! Depending on the customer’s CRM system the invoices might be linked only to accounts-module. In this case just replace the contacts with accounts.) Next create the conditions (see the picture below).

With the target groups you can use either dates or automatic time periods. To create these automatic periods you can use the next terms (you can determine the number yourself):
-10 day
-10 week
-10 month
-10 year
10 day
10 week
10 month
10 year
5. Have the contacts that have their birthday today
The contacts have the field Birthdate which can be used on a target group condition to identify the contacts that have their birthday that day. This is done by first selecting the Birthdate field and setting a condition Same day and a value “0 day”. NOTE. The Same day condition only takes date and month into account, not year. Therefore, the condition should be used with target groups that should be repeated annually.
![]()
6. Target group functions
Adding Functions to module relations you can include or remove the contacts from different target groups or reports made by report generator to a new one. In the condition, you can also decide whether the used target group will update, when the target group with the condition is updated (dynamic), or the information will only be used (static).
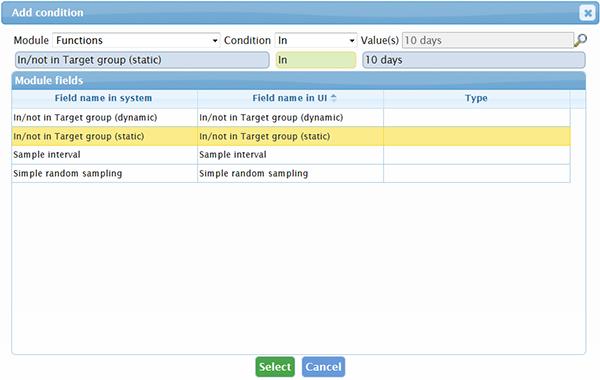
For example: you have created a target group of contacts whose invoice due date was within 10 days. You can include this target group to a new one by determining the module to Functions, the field to In/not in Target group, the condition to in and the value to the original target group. You can also add new condition for example to get all the contacts that have e-mail addresses. Now you can add a task to the target group’s contacts to ask about a payment plan via e-mail.
