Outlook Add-in Setup
It is possible to synchronize your calendar and emails in CRM with the calendar and emails in your Outlook account. To do this, you’ll need to download and install the CRM Add-in for Outlook (you can find the download links in the guide Downloading the Outlook Add-in).
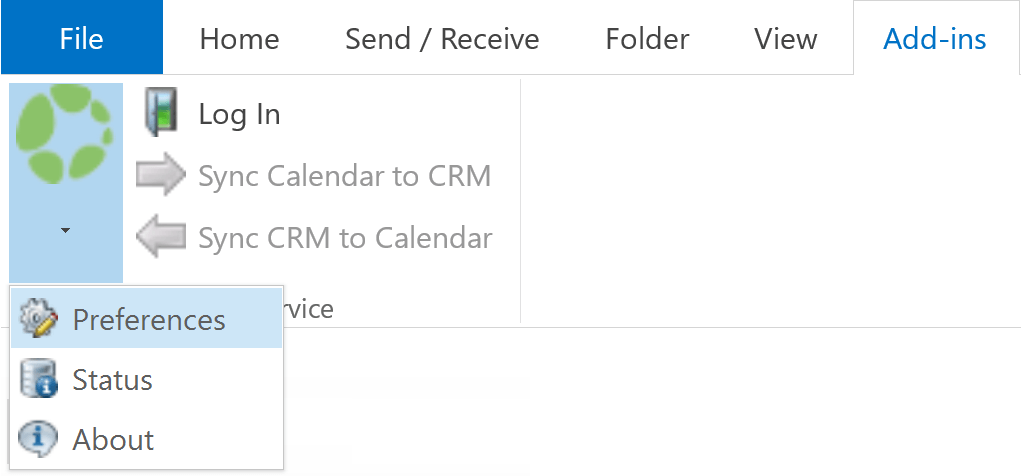
When the add-in is downloaded and installed, you will have to determine which Outlook account and calendar synchronizes with the CRM account. This is done on the Add-ins tab in Outlook (see the picture below). Click the CRM logo and select Preferences to start.
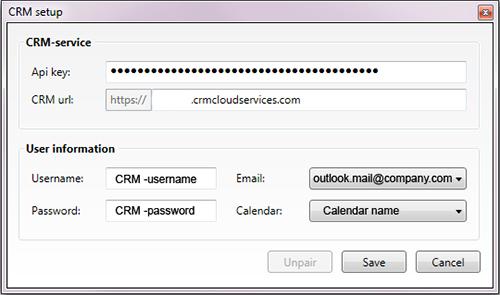
The following information is required for the setup (see the picture below):
- API key: the Outlook typed API key of the CRM. The API keys are managed in the CRM in Settings → Webservice API-keys
- CRM url: the internet address of the company’s CRM
- Username and Password: the username and password of the CRM user to be synchronized
- Email and Calendar: the email address and calendar of the Outlook account to be synchronized.
When all the required information is filled, you can proceed to the next phase by clicking Save.
(If you want to change the calendar that synchronizes with CRM later, you’ll need to unpair the existing pairing first. If the unpairing is not possible, the add-in will ask if you want to do a forced unpairing. The risk with the forced unpairing is that the activities might be marked twice when the syncronization is started again.)
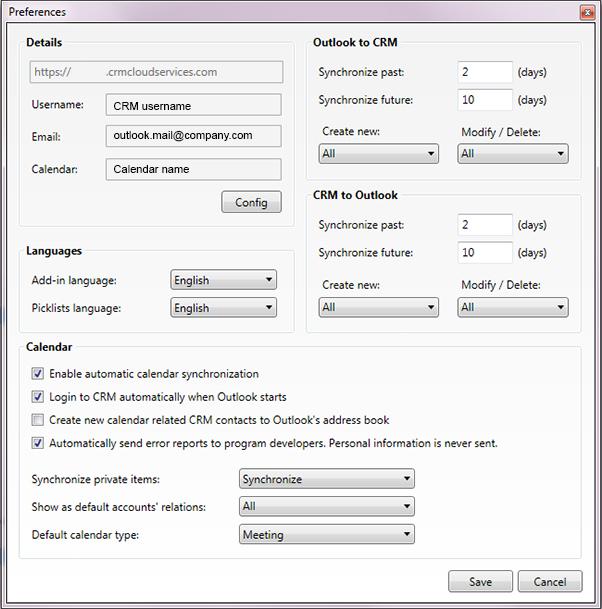
In the next view you will determine more detailed settings for the synchronizing and the user interface of the add-in.
In the Outlook to CRM and CRM to Outlook sections you can determine the settings for the synchronizing for the both directions separately in the following fields:
- Synchronize past: determines the synchronized time period from this day to the past. The maximum value is 60 days.
- Synchronize future: determines the synchronized time period from this day to the future. The maximum value is 365 days.
- Create new: picklist, on which you can select the activity types that are synchronized between Outlook and CRM. By default, all the activities are synchronized, but you can also select only certain activity types on the list. If there are no types at all selected, no synchronizing is done.
- Modify/Delete: picklist, on which you can select the activity types that are updated if any changes are made or the activity is deleted.
Languages section:
- Add-in language: the language of the add-in.
- Picklist language: the language of the picklists, that are fetched from the CRM.
Calendar section:
- Enable automatic calendar synchronization: the calendar synchronizing is done automatically. If you are logged in to the Outlook add-in, synchronizing will happen approximately in 5 seconds from Outlook to CRM.
- Login to CRM automatically when Outlook starts: when you start Outlook, you will automatically log in to the Add-in as well. You will need to allow the add-in to remember the password to enable this function (see further below).
- Create new calendar related to CRM contacts to Outlook address book: the contacts linked to an activity will be added to your Outlook address book.
- Automatically send error reports to program developers.
- Synchronize private items: the private items can be either synchronized completely, synchronized without content specification or not synchronized.
- Show as default accounts’ relations: on a search for relations the system can show only the selected relations or all of them. These relations will be shown before any search terms are entered.
- Default calendar type: the selection will be set as the default activity type on every activity created on Outlook. The activity type can always be changed manually if the new activity should be of other type. If the default type is set to *empty*, by default the activities on Outlook do not synchronize to CRM because there is no activity type chosen. NB: With this setting for each individual event, the event type must be manually selected to activate the synchronization of this particular event.
After saving the settings you can log in to the Add-in on the Add-ins tab by clicking the Log in button. To enable automatic login in the future, you’ll need to check the Remember your login information checkbox (see the picture below).
